Introduction
Adding a printer to your Mac is usually a quick process, but depending on your printer type, network configuration, and macOS version, the setup steps can vary. Whether you’re connecting a wireless printer in your home office, a network printer at work, or a USB printer directly to your Mac, macOS includes built-in tools that make installation straightforward.
Most modern printers support AirPrint, allowing users to print without downloading additional drivers. However, older printers or enterprise network printers may require manual setup.
In this guide, you’ll learn how to add a printer to a Mac using different connection methods, troubleshoot common issues, and optimize your printing experience.
Quick Answer
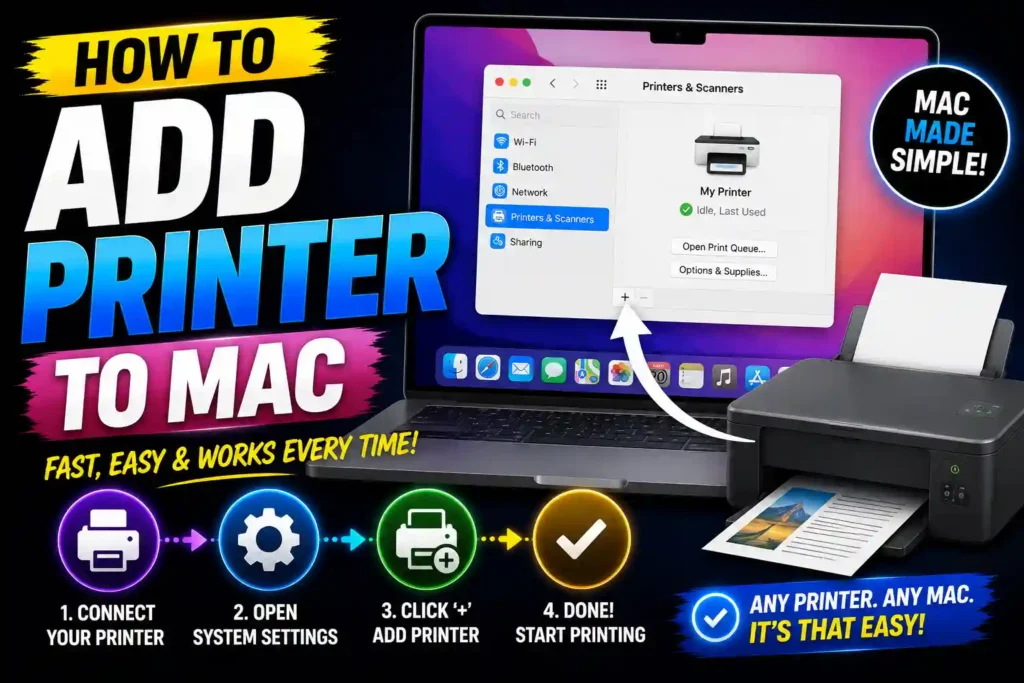
To add a printer to a Mac:
- Connect the printer via Wi-Fi, USB, or Ethernet.
- Open System Settings.
- Click Printers & Scanners.
- Select Add Printer, Scanner, or Fax.
- Choose your printer from the list.
- Click Add.
- macOS will automatically install the required software if available.
Your printer should now be ready to use.
Table of Contents
- Understanding Printer Connections on Mac
- Before You Add a Printer
- How to Add a Printer Using AirPrint
- How to Add a USB Printer to Mac
- How to Add a Wireless Printer to Mac
- How to Add a Network Printer Using IP Address
- How to Remove and Reinstall a Printer
- Common Printer Errors and Fixes
- Best Practices and Pro Tips
- FAQ
- Conclusion
Understanding Printer Connections on Mac
macOS supports several printer connection methods:
AirPrint
AirPrint is Apple’s built-in wireless printing technology. It allows compatible printers to work without installing drivers.
USB Connection
A direct cable connection between your printer and Mac.
Wi-Fi Printing
Printers connect to the same wireless network as your Mac.
Ethernet Network Printing
Common in offices and enterprise environments.
IP-Based Printing
Advanced method where you manually enter the printer’s IP address.
Understanding your printer type helps determine the correct setup process.
Before You Add a Printer
Before starting, verify the following:
- Printer is powered on.
- Printer has paper and ink/toner.
- Mac is connected to the internet.
- Printer and Mac are on the same Wi-Fi network (for wireless printing).
- macOS is updated.
- Printer firmware is up to date.
If you’re experiencing broader Mac issues, consider reviewing our guide on resetting a Mac:
https://multicaretechnical.com/how-to-reset-macbook-to-factory-settings-complete-guide-for-all-macos-versions
How to Add a Printer Using AirPrint
AirPrint is the easiest method.
Step 1: Connect Printer to Wi-Fi
Use the printer’s display panel to connect it to your wireless network.
Step 2: Open System Settings
Click:
Apple Menu → System Settings
Step 3: Open Printers & Scanners
Select:
Printers & Scanners
Step 4: Add Printer
Click:
Add Printer, Scanner, or Fax
Step 5: Select Printer
Your AirPrint-compatible printer should appear automatically.
Step 6: Confirm AirPrint
In the “Use” field, ensure:
AirPrint
is selected.
Step 7: Click Add
macOS completes the installation automatically.
You can now print from any application.
How to Add a USB Printer to Mac
Many businesses still use USB-connected printers for reliability.
Step 1: Connect Printer
Connect the USB cable to your Mac.
For newer MacBooks, you may need a USB-C adapter.
Step 2: Turn On Printer
Wait a few moments for macOS to detect the device.
Step 3: Open Printers & Scanners
Navigate to:
System Settings → Printers & Scanners
Step 4: Click Add Printer
Your connected printer should appear automatically.
Step 5: Install Driver
macOS may:
- Install software automatically
- Download drivers from Apple
- Prompt you to install manufacturer software
Step 6: Finish Setup
Click Add.
The printer is now available.
How to Add a Wireless Printer to Mac
Wireless printers are the most common choice for homes and offices.
Step 1: Connect Printer to Wi-Fi
Use the printer’s setup wizard or touchscreen.
Step 2: Verify Network
Ensure:
- Mac and printer are connected to the same Wi-Fi network.
- VPN is temporarily disabled if discovery issues occur.
Step 3: Open Printer Settings
Go to:
System Settings → Printers & Scanners
Step 4: Add Printer
Click:
Add Printer, Scanner, or Fax
Step 5: Choose Printer
Select the detected printer.
Step 6: Complete Installation
Click Add.
Print a test page to verify connectivity.
How to Add a Network Printer Using IP Address
Many corporate environments use IP-based printer deployment.
Step 1: Find Printer IP Address
You can usually locate it by:
- Printing a network configuration page
- Viewing network settings on the printer screen
- Checking your router’s device list
Step 2: Open Printers & Scanners
Navigate to:
System Settings → Printers & Scanners
Step 3: Add Printer
Click:
Add Printer, Scanner, or Fax
Step 4: Select IP Tab
Choose the IP option.
Step 5: Enter Printer Information
Fill in:
- Address (IP address)
- Protocol
- Queue (if required)
- Name
Step 6: Select Driver
Choose:
- AirPrint
- Generic PostScript Printer
- Manufacturer-specific driver
Step 7: Click Add
The printer should now be available across the network.
How to Remove and Reinstall a Printer
If a printer stops working, reinstalling often resolves the issue.
Remove Printer
- Open Printers & Scanners.
- Select the printer.
- Click Remove Printer.
Reinstall Printer
- Click Add Printer.
- Choose the device.
- Complete setup again.
This refreshes printer settings and driver configurations.
Common Errors and Fixes
Printer Not Showing Up
Fixes
- Restart printer.
- Restart Mac.
- Reconnect Wi-Fi.
- Disable VPN temporarily.
- Verify network connectivity.
Printer Offline
Fixes
- Check power connection.
- Restart printer spooler.
- Remove and re-add printer.
- Verify printer IP address.
Driver Not Available
Fixes
- Update macOS.
- Download latest driver from printer manufacturer.
- Use AirPrint if supported.
Printing Queue Stuck
Fixes
- Open Printers & Scanners.
- Open printer queue.
- Cancel stuck jobs.
- Restart printer.
Slow Wireless Printing
Fixes
- Move printer closer to router.
- Upgrade Wi-Fi signal strength.
- Assign a static IP address.
- Update printer firmware.
Best Practices / Pro Tips
Use AirPrint Whenever Possible
AirPrint reduces driver conflicts and simplifies management.
Keep macOS Updated
Printer compatibility improves with system updates.
Update Printer Firmware
Manufacturers frequently release stability improvements.
Use Static IP Addresses in Offices
This prevents printers from disappearing after DHCP changes.
Print Test Pages Regularly
Early testing can identify connectivity issues before important print jobs.
Organize Multiple Printers
Rename printers clearly, such as:
- Office Laser Printer
- Warehouse Printer
- Reception Color Printer
This helps avoid sending documents to the wrong device.
Related Mac and Apple Guides
If you regularly use Apple devices, you may also find these tutorials helpful:
- https://multicaretechnical.com/how-to-access-clipboard-on-mac-view-clipboard-history-shortcuts-guide
- https://multicaretechnical.com/how-to-reset-macbook-to-factory-settings-complete-guide-for-all-macos-versions
- https://multicaretechnical.com/how-to-disable-5g-on-iphone-2026-guide-save-battery-and-use-lte
These guides cover productivity, troubleshooting, and device optimization.
FAQ
1. Why won’t my Mac detect my printer?
The printer may be offline, connected to a different network, blocked by a VPN, or require updated drivers.
2. Can I add a printer without installing drivers?
Yes. AirPrint-compatible printers work without manually installing drivers.
3. How do I find my printer’s IP address?
Check the printer’s network settings, print a configuration page, or view connected devices in your router settings.
4. Can I connect an old printer to a new Mac?
Yes. You may need a USB-C adapter and updated printer drivers.
5. How do I make a wireless printer the default printer on Mac?
Go to System Settings → Printers & Scanners and select the printer as the default device.
Conclusion
Learning how to add a printer to a Mac is a simple process once you understand the available connection methods. Whether you’re using AirPrint, a USB cable, Wi-Fi, or a network printer, macOS provides built-in tools that make setup quick and reliable.
For most users, AirPrint offers the easiest experience because it eliminates driver installation. In business environments, IP-based configuration provides greater control and reliability. If you encounter problems, basic troubleshooting steps such as checking network connectivity, updating drivers, and reinstalling the printer often resolve the issue.
By following the steps in this guide, you can quickly connect almost any printer to your Mac and maintain a smooth, efficient printing workflow.