Introduction
Background noise can ruin an otherwise perfect call, voice recording, or video on your iPhone. Whether you’re in a busy office, a noisy street, or working remotely, unwanted sounds like traffic, wind, or chatter can make communication frustrating.
The good news is that modern iPhones come with powerful built-in tools designed to reduce background noise. Even better, there are additional settings and techniques you can use to significantly improve audio clarity.
In this complete guide, you’ll learn exactly how to reduce background noise on your iPhone using both built-in features and advanced tips—perfect for everyday users and IT professionals alike.
Quick Answer
To reduce background noise on an iPhone:
- Enable Voice Isolation during calls
- Turn on Phone Noise Cancellation in Accessibility settings
- Use a high-quality headset or microphone
- Reduce environmental noise
- Update iOS for the latest audio improvements
These steps significantly improve call and recording clarity on iPhones.
Table of Contents
- What Causes Background Noise on iPhone?
- How iPhone Noise Reduction Works
- Step-by-Step Guide to Reduce Background Noise
- Common Errors and Fixes
- Best Practices / Pro Tips
- Conclusion
- FAQs
What Causes Background Noise on iPhone?
Before fixing the issue, it’s important to understand what creates background noise:
- Environmental sounds (traffic, wind, people talking)
- Poor microphone positioning
- Low-quality network connections
- App-specific audio limitations
- Outdated iOS versions
Even though iPhones are designed with multiple microphones for noise cancellation, improper settings or conditions can still cause issues.
How iPhone Noise Reduction Works
Apple uses a combination of hardware and software to filter noise:
- Multiple microphones detect and isolate voice
- AI-based processing separates speech from noise
- Real-time filtering removes unwanted sounds
Features like Voice Isolation and Noise Cancellation are key to improving audio quality.
Step-by-Step Guide to Reduce Background Noise
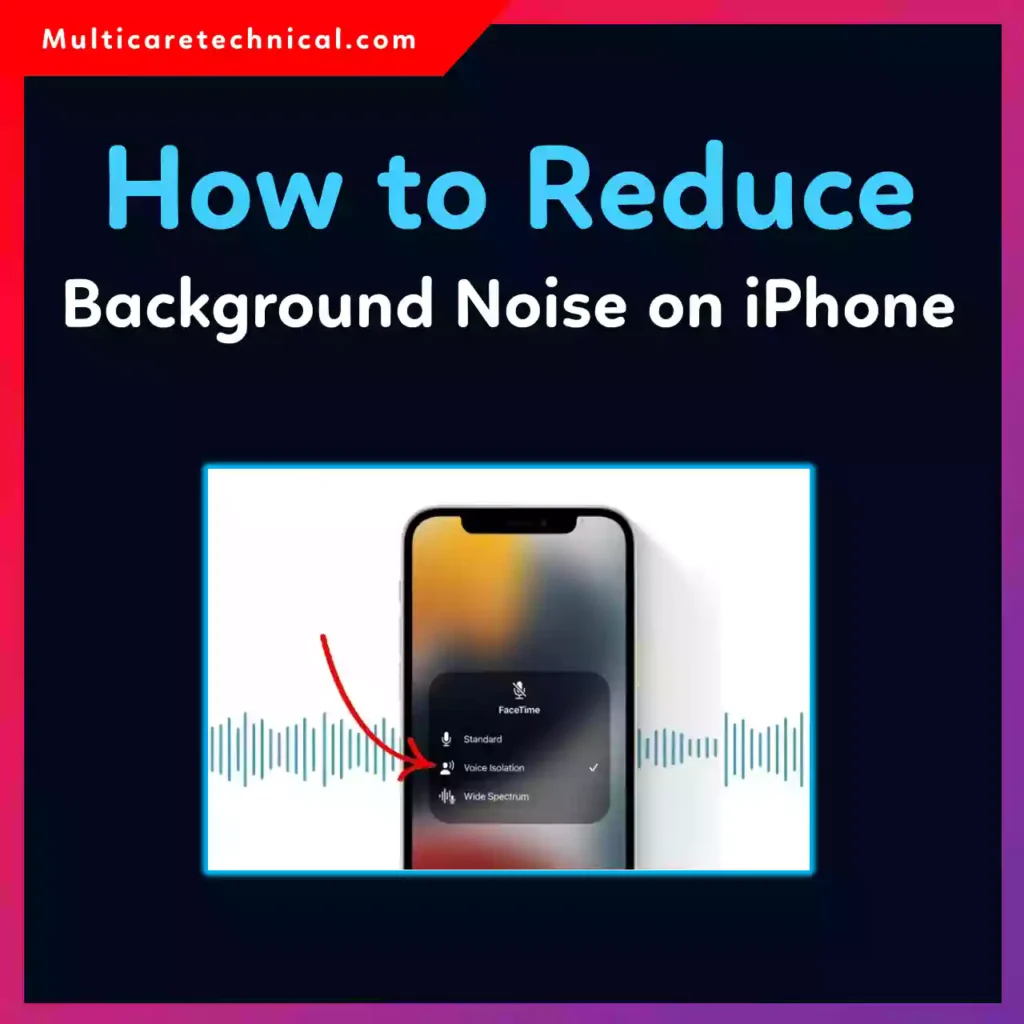
1. Enable Voice Isolation (For Calls)


5
Voice Isolation is one of the most powerful features introduced in recent iOS versions.
Steps:
- Start a call (FaceTime, WhatsApp, or supported apps)
- Open Control Center
- Tap Mic Mode
- Select Voice Isolation
This feature prioritizes your voice and blocks background sounds.
2. Turn On Phone Noise Cancellation


6
This setting reduces ambient noise during phone calls.
Steps:
- Go to Settings
- Tap Accessibility
- Select Audio/Visual
- Enable Phone Noise Cancellation
3. Use Headphones or External Microphones
Using AirPods or wired headsets can dramatically improve sound quality.
- Built-in mics are good, but external ones are better
- Ideal for meetings, recordings, and professional calls
4. Reduce Environmental Noise
Even the best software can’t fully eliminate loud surroundings.
Tips:
- Move to a quieter location
- Avoid windy areas
- Close windows or doors
5. Update iOS Regularly
Apple frequently improves audio processing.
Steps:
- Go to Settings → General → Software Update
- Install the latest version
6. Adjust App-Specific Settings
Some apps (Zoom, Teams, etc.) have their own noise suppression features.
- Enable “Noise Suppression” or “Background Noise Reduction”
- Check app audio settings
Common Errors and Fixes
❌ Voice Isolation Not Working
Fix: Ensure your app supports it (FaceTime and some third-party apps only)
❌ Noise Cancellation Option Missing
Fix: Check iOS version—older devices may not support it
❌ Poor Audio Despite Settings
Fix: Clean your microphone (dust can block sound)
❌ Distorted Voice Output
Fix: Disable extra filters in third-party apps
❌ Background Noise Still Loud
Fix: Combine multiple methods (Voice Isolation + quiet environment)
Best Practices / Pro Tips
✔ Keep Microphones Clean
Dust and debris can reduce mic performance.
✔ Position Your iPhone Correctly
Speak directly toward the microphone for best results.
✔ Use Professional Accessories
For IT professionals and content creators, invest in:
- Lavalier microphones
- USB audio interfaces
- Noise-canceling headsets
✔ Test Audio Before Important Calls
Always test your setup before meetings or recordings.
✔ Optimize Related Settings
For better overall device performance and experience, check these helpful guides:
- https://multicaretechnical.com/how-to-reset-facebook-algorithm-complete-guide
- https://multicaretechnical.com/how-to-disable-ad-blocker-on-iphone-complete-guide
- https://multicaretechnical.com/how-to-run-powershell-scripts-automatically
These resources help optimize your device and workflow.
Conclusion
Reducing background noise on your iPhone is easier than ever thanks to built-in features like Voice Isolation and Phone Noise Cancellation. By combining these tools with smart habits—like using better microphones and minimizing environmental noise—you can achieve clear, professional-quality audio.
Whether you’re on an important business call or recording content, these techniques ensure your voice is heard loud and clear.
Consistency is key. Once you apply these settings and practices, you’ll notice a significant improvement in audio quality across all apps and use cases.
FAQs
1. How do I turn on noise cancellation on iPhone?
Go to Settings → Accessibility → Audio/Visual → Phone Noise Cancellation and enable it.
2. What is Voice Isolation on iPhone?
Voice Isolation is a feature that prioritizes your voice and blocks background noise during calls.
3. Why is my iPhone picking up background noise?
This can happen due to environmental noise, poor mic positioning, or disabled noise reduction settings.
4. Does iPhone noise cancellation work on all apps?
No, some features like Voice Isolation only work on supported apps such as FaceTime.
5. Can I reduce noise while recording videos?
Yes, by using external microphones, quiet environments, and editing tools.