Introduction
Modern graphics cards are capable of delivering impressive gaming and workstation performance, but many users never take advantage of features designed to unlock additional speed. One such feature is Resizable BAR (Base Address Register), a PCI Express technology that allows the CPU to access the entire graphics card memory buffer instead of small portions at a time.
When enabled, Resizable BAR can improve performance in supported games and professional workloads. Depending on the application, users may see smoother gameplay, improved frame rates, and better overall responsiveness.
If you recently upgraded your graphics card or motherboard, enabling this feature may be one of the easiest ways to gain extra performance without spending additional money.
This guide explains what Resizable BAR is, how it works, how to enable it on different motherboard brands, and how to fix common issues that may prevent it from working properly.
Quick Answer
To enable Resizable BAR:
- Restart your computer and enter BIOS/UEFI.
- Enable Above 4G Decoding.
- Enable Resizable BAR Support.
- Disable Compatibility Support Module (CSM) if required.
- Save BIOS settings and restart.
- Verify Resizable BAR is active through your GPU software.
Most modern NVIDIA and AMD graphics cards support Resizable BAR when paired with a compatible motherboard and BIOS version.
Table of Contents
- What Is Resizable BAR?
- Benefits of Enabling Resizable BAR
- Hardware Requirements
- How to Enable Resizable BAR in BIOS
- Gigabyte Motherboard Instructions
- MSI Motherboard Instructions
- ASUS Motherboard Instructions
- ASRock Motherboard Instructions
- NVIDIA Graphics Card Setup
- AMD Graphics Card Setup
- How to Verify Resizable BAR Is Working
- Common Errors and Fixes
- Best Practices
- FAQs
- Conclusion
What Is Resizable BAR?
Resizable BAR is a PCIe feature that allows the processor to access the full VRAM capacity of a graphics card at once.
Traditionally, CPUs could only access GPU memory in small chunks. Resizable BAR removes that limitation and enables larger data transfers between the CPU and GPU.
This technology became widely popular after being adopted by major GPU manufacturers and motherboard vendors.
While performance gains vary by application, supported games can benefit from improved communication between hardware components.
Benefits of Enabling Resizable BAR
Advantages include:
- Improved gaming performance in supported titles
- Better asset streaming
- Reduced bottlenecks between CPU and GPU
- Enhanced system responsiveness
- Potential performance gains in creative workloads
Some games show only minor improvements, while others may experience noticeable frame-rate increases.
Hardware Requirements
Before enabling Resizable BAR, verify that your system meets the requirements.
Compatible Components
You generally need:
- UEFI motherboard
- Updated motherboard BIOS
- Compatible CPU
- Compatible NVIDIA or AMD GPU
- GPT-formatted system drive
- Windows 10 or Windows 11
Older hardware may require firmware updates before the feature becomes available.
How to Enable Resizable BAR in BIOS
Most motherboards follow a similar process.
Step 1: Enter BIOS
Restart the PC and press the BIOS key during startup.
Common keys include:
- Delete
- F2
- F10
Step 2: Locate PCIe Settings
Navigate to:
- Advanced Settings
- PCIe Configuration
- IO Ports
- System Agent Configuration
The exact menu depends on the motherboard manufacturer.
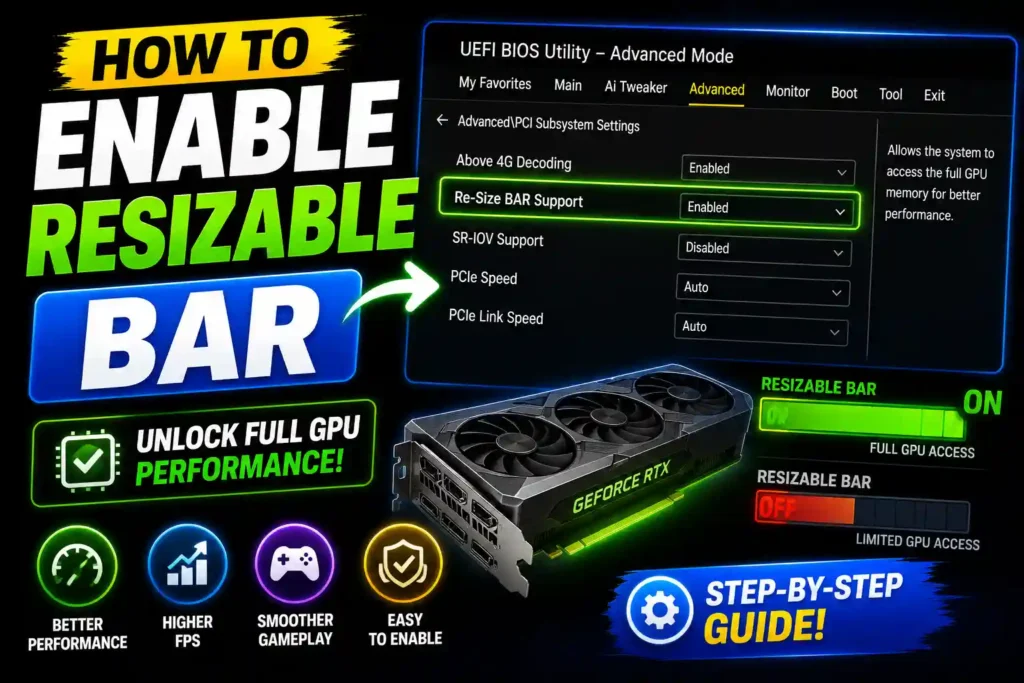
Step 3: Enable Above 4G Decoding
This option must usually be enabled before Resizable BAR becomes available.
Set:
Above 4G Decoding = Enabled
Step 4: Enable Resizable BAR
Find:
Resizable BAR Support
Set it to:
Enabled
Step 5: Disable CSM
Many systems require:
CSM = Disabled
If your operating system was installed in Legacy BIOS mode, you may need to convert the drive to GPT first.
Step 6: Save and Exit
Save changes and reboot the system.
Gigabyte Motherboard Configuration
Users frequently search for instructions regarding Gigabyte boards because menu layouts vary slightly between BIOS versions.
To enable the feature on Gigabyte systems:
- Enter BIOS.
- Switch to Advanced Mode.
- Open Settings.
- Navigate to IO Ports.
- Enable Above 4G Decoding.
- Enable Re-Size BAR Support.
- Save settings.
- Restart the PC.
Updating the motherboard BIOS beforehand is highly recommended.
Gigabyte Graphics Performance Tips
After enabling the BIOS settings:
- Install the latest GPU drivers.
- Update motherboard firmware.
- Confirm feature activation inside the graphics driver panel.
Many users overlook firmware updates and assume the feature is unsupported when the issue is simply an outdated BIOS.
MSI Motherboard Setup Guide
MSI boards generally make the process straightforward.
To configure the feature:
- Enter BIOS.
- Select Advanced Mode.
- Open PCI Subsystem Settings.
- Enable Above 4G Memory.
- Enable Re-Size BAR Support.
- Save changes.
- Reboot the computer.
Recent MSI BIOS versions typically include dedicated Resizable BAR settings.
MSI Optimization Recommendations
For best results:
- Install the latest BIOS version.
- Update chipset drivers.
- Use current graphics drivers.
- Verify UEFI boot mode is enabled.
These steps help prevent compatibility issues.
ASUS Motherboard Instructions
ASUS motherboards include the necessary options in Advanced Mode.
Steps:
- Enter BIOS.
- Open Advanced Settings.
- Select PCI Subsystem Settings.
- Enable Above 4G Decoding.
- Enable Resizable BAR Support.
- Save and restart.
Some older ASUS boards may require a BIOS update before these settings appear.
ASRock Motherboard Configuration
ASRock systems support Resizable BAR on many modern platforms.
Procedure:
- Access BIOS.
- Open Advanced Settings.
- Navigate to PCI Configuration.
- Enable Above 4G Decoding.
- Enable Re-Size BAR Support.
- Save settings.
- Restart.
If the option is missing, check for a newer BIOS release.
NVIDIA Graphics Card Setup
Most RTX 30-series, RTX 40-series, and newer GPUs support Resizable BAR.
After enabling BIOS settings:
- Install the latest NVIDIA drivers.
- Open NVIDIA Control Panel.
- Select System Information.
- Verify that Resizable BAR displays as “Yes.”
If it displays “No,” review BIOS settings and firmware updates.
AMD Graphics Card Setup
AMD refers to a similar implementation as Smart Access Memory (SAM).
Compatible Radeon graphics cards can benefit from this technology when paired with supported AMD processors and motherboards.
Steps include:
- Enable Above 4G Decoding.
- Enable Re-Size BAR Support.
- Update Radeon drivers.
- Confirm activation in AMD Software.
How to Verify Resizable BAR Is Working
NVIDIA Users
Open:
NVIDIA Control Panel → System Information
Look for:
Resizable BAR: Yes
AMD Users
Open:
AMD Software Adrenalin Edition
Check performance or hardware information pages for Smart Access Memory status.
Common Errors and Fixes
Resizable BAR Option Missing
Possible causes:
- Outdated BIOS
- Unsupported motherboard
- Unsupported CPU
Solution:
Update BIOS and verify hardware compatibility.
Resizable BAR Shows Disabled
Possible causes:
- CSM enabled
- Above 4G Decoding disabled
Solution:
Enable required settings and reboot.
System Fails to Boot
Possible causes:
- Legacy boot mode
- MBR partition style
Solution:
Convert system drive to GPT and use UEFI mode.
No Performance Improvement
Possible causes:
- Unsupported game
- CPU bottleneck
- Older drivers
Solution:
Update drivers and test multiple supported applications.
Graphics Driver Reports Unsupported
Possible causes:
- Old firmware
- Driver version outdated
Solution:
Install the latest motherboard and GPU firmware updates.
Best Practices and Pro Tips
Update BIOS First
Manufacturers frequently add support through BIOS updates.
Keep GPU Drivers Current
Updated drivers improve compatibility and stability.
Use UEFI Mode
Resizable BAR works best with modern UEFI configurations.
Benchmark Before and After
Compare gaming performance before enabling the feature to measure actual gains.
Monitor System Stability
Test games and workloads after making BIOS changes.
Related Guides
While optimizing your system, you may also find these guides helpful:
- How to Change DNS on Router: https://multicaretechnical.com/how-to-change-dns-on-router-complete-guide-for-tp-link-huawei-att-more
- How to Restore Deleted Instagram Messages: https://multicaretechnical.com/how-to-restore-deleted-instagram-messages-complete-recovery-guide
- How to Restore Closed Tabs in Safari on iPhone: https://multicaretechnical.com/how-to-restore-closed-tabs-safari-iphone-recover-recently-closed-tabs-easily
Frequently Asked Questions
1. What does Resizable BAR do?
Resizable BAR allows the CPU to access the entire graphics card memory buffer instead of small segments, potentially improving performance.
2. Is Resizable BAR safe to enable?
Yes. It is an officially supported PCIe feature from motherboard and graphics card manufacturers.
3. Does Resizable BAR increase FPS?
In supported games, it can improve frame rates and reduce bottlenecks, although gains vary by title.
4. Do I need a BIOS update?
Many systems require a BIOS update before Resizable BAR settings become available.
5. Can older graphics cards use Resizable BAR?
Support depends on the GPU model, motherboard, processor, and firmware. Not all older hardware is compatible.
Conclusion
Resizable BAR is one of the easiest performance-enhancing features available on modern PCs. By allowing the processor to access the full memory capacity of the graphics card, it can improve gaming performance, reduce data transfer bottlenecks, and enhance system responsiveness in supported applications.
Whether you use an NVIDIA or AMD graphics card and a motherboard from MSI, ASUS, Gigabyte, or ASRock, enabling the feature usually requires only a few BIOS changes. After updating firmware, enabling Above 4G Decoding, turning on Resizable BAR support, and verifying operation through your graphics software, you can take advantage of this powerful technology with minimal effort.