Introduction
Your router acts as the gateway between your devices and the internet. Every time you visit a website, your router relies on DNS (Domain Name System) servers to translate domain names into IP addresses.
Most internet service providers automatically assign DNS servers, but many users choose alternatives such as Google DNS or Cloudflare DNS for improved speed, privacy, and reliability.
If you’re experiencing slow website loading, DNS-related errors, or simply want more control over your network, changing the DNS settings on your router can be a smart solution. The good news is that once you update the DNS settings on your router, every connected device can benefit without requiring individual configuration.
This guide explains everything you need to know, including router-specific instructions and troubleshooting tips.
Quick Answer
To change DNS on a router:
- Open a web browser.
- Enter your router’s IP address (commonly 192.168.1.1 or 192.168.0.1).
- Sign in using your administrator credentials.
- Navigate to Internet, WAN, DHCP, or Network settings.
- Locate Primary DNS and Secondary DNS fields.
- Enter your preferred DNS servers.
- Save the changes and reboot the router if required.
Popular DNS Servers:
| Provider | Primary DNS | Secondary DNS |
|---|---|---|
| Google DNS | 8.8.8.8 | 8.8.4.4 |
| Cloudflare DNS | 1.1.1.1 | 1.0.0.1 |
| OpenDNS | 208.67.222.222 | 208.67.220.220 |
Table of Contents
- What Is DNS and Why Change It?
- How to Configure DNS on Router
- Step-by-Step Guide for Most Routers
- TP-Link Router Instructions
- Huawei Router Instructions
- ZTE Router Instructions
- AT&T Router Instructions
- Quantum Fiber Router Instructions
- WE Router Instructions
- Common Errors and Fixes
- Best Practices
- Frequently Asked Questions
- Conclusion
What Is DNS and Why Change It?
DNS stands for Domain Name System. Think of it as the internet’s phonebook.
When you type a website address into your browser, DNS servers help locate the correct web server. Without DNS, you would need to remember numerical IP addresses for every website.
Benefits of changing DNS include:
- Faster website loading
- Improved browsing reliability
- Enhanced privacy
- Better protection against malicious websites
- Reduced ISP DNS outages
- More consistent internet performance
Many businesses and IT professionals switch to public DNS providers to improve network stability and security.
How to Configure DNS on Router
Configuring DNS on a router affects all connected devices, including:
- Computers
- Smartphones
- Smart TVs
- Gaming consoles
- Security cameras
- IoT devices
Instead of updating DNS settings on each device individually, changing it on the router provides network-wide coverage.
The exact menu names vary depending on the router manufacturer, but the overall process remains similar.
Step-by-Step Guide: How to Change DNS on Router
Step 1: Find Your Router’s IP Address
Common router addresses include:
- 192.168.1.1
- 192.168.0.1
- 10.0.0.1
You can also check the label on the router.
Step 2: Log Into the Router
Open a browser and enter the router’s IP address.
Sign in using the administrator username and password.
Step 3: Locate Internet Settings
Depending on the router model, look for:
- WAN Settings
- Internet Settings
- DHCP Settings
- Network Settings
- Advanced Setup
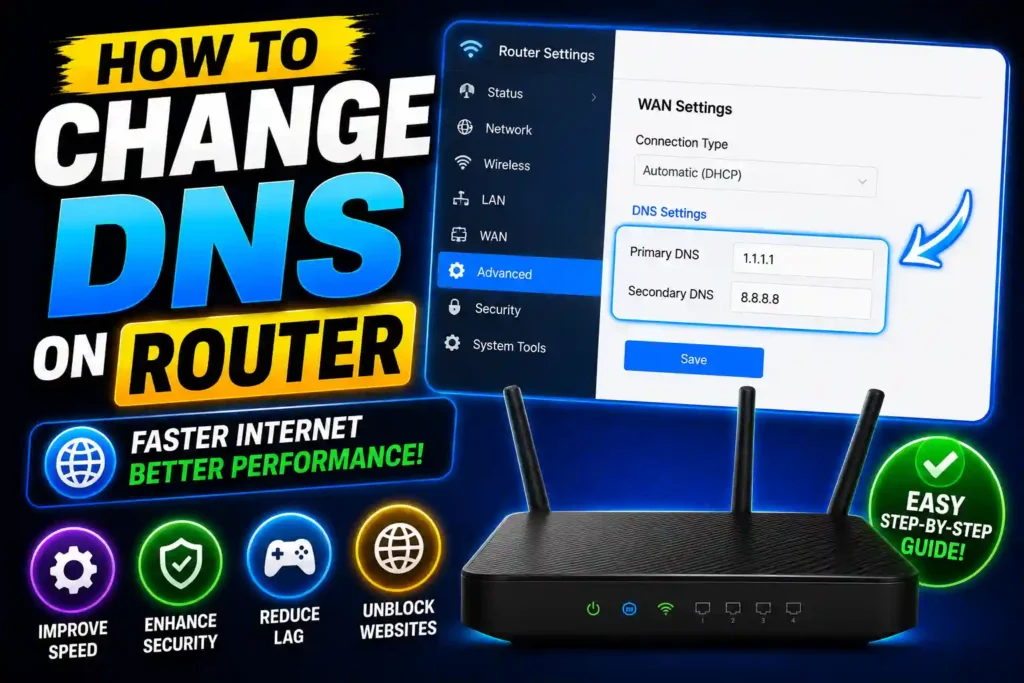
Step 4: Enter New DNS Servers
Replace the existing DNS entries with your preferred provider.
Example:
Primary DNS: 1.1.1.1
Secondary DNS: 1.0.0.1
Step 5: Save and Reboot
Save your changes and restart the router if necessary.
Step 6: Test Connectivity
Visit several websites to verify everything is working correctly.
TP-Link Routers: DNS Configuration Guide
Many users search for instructions related to TP-Link devices because they are among the most popular home routers.
To update DNS settings:
- Log in to the TP-Link router dashboard.
- Select Advanced Settings.
- Open Network.
- Choose Internet or WAN.
- Locate DNS Server fields.
- Enter your preferred DNS addresses.
- Save settings.
- Restart the router.
Newer TP-Link firmware may also include automatic DNS optimization features.
Huawei Router Setup
Huawei routers use slightly different menu layouts depending on firmware versions.
To modify DNS settings:
- Access the router admin page.
- Navigate to Internet Settings.
- Select WAN Configuration.
- Disable automatic DNS assignment if enabled.
- Enter custom DNS addresses.
- Save and reboot.
Business-grade Huawei devices may provide additional DNS management features.
Updating DNS on ZTE Routers
ZTE routers are commonly used by internet providers worldwide.
To change DNS:
- Log into the router.
- Open Network Settings.
- Select WAN.
- Find DNS Server options.
- Enter preferred DNS values.
- Apply settings.
- Restart the router.
After restarting, connected devices should automatically begin using the new DNS servers.
AT&T Gateway Configuration
AT&T gateways sometimes limit DNS customization depending on the model.
If your device allows DNS changes:
- Open the AT&T gateway interface.
- Navigate to Home Network.
- Select Advanced Settings.
- Locate DNS configuration options.
- Enter custom DNS values.
- Save settings.
Some AT&T gateways require DNS changes to be configured on individual devices rather than the gateway itself.
Quantum Fiber Router DNS Settings
Quantum Fiber users can typically modify DNS through the router’s administration panel.
General steps include:
- Sign in to the router.
- Access WAN Settings.
- Locate DNS configuration.
- Enter preferred DNS servers.
- Save changes.
- Restart the router.
If DNS fields are locked, consult the router documentation supplied by Quantum Fiber.
WE Router Configuration Tips
WE internet customers may encounter different router models, including Huawei and ZTE devices.
The process generally involves:
- Logging into the router dashboard.
- Opening WAN settings.
- Locating DNS fields.
- Entering custom DNS servers.
- Saving and restarting.
The exact interface depends on the hardware model supplied by the provider.
How to Switch DNS on Router Safely
Before changing settings:
- Record existing DNS values.
- Take screenshots of current settings.
- Use reputable DNS providers.
- Avoid unknown public DNS services.
- Restart devices after making changes.
These precautions make it easier to restore previous settings if needed.
How to Update DNS on Router After ISP Changes
Sometimes internet providers modify network configurations.
If websites stop loading after an ISP update:
- Log in to the router.
- Verify DNS settings.
- Re-enter preferred DNS values.
- Reboot the router.
- Clear DNS cache on connected devices.
This process often resolves connectivity issues.
Common Errors and Fixes
Websites Won’t Load
Possible causes:
- Incorrect DNS entries
- Typing mistakes
- ISP restrictions
Solution:
Double-check DNS addresses and restart the router.
Slow Browsing After DNS Change
Possible causes:
- DNS provider located far away
- Temporary DNS cache issues
Solution:
Try another provider such as Cloudflare or Google DNS.
Router Rejects DNS Settings
Possible causes:
- ISP firmware restrictions
- Router limitations
Solution:
Update firmware or configure DNS on individual devices.
DNS Settings Keep Reverting
Possible causes:
- ISP-managed router
- Automatic configuration enabled
Solution:
Disable automatic DNS assignment if available.
Internet Stops Working Completely
Possible causes:
- Invalid DNS addresses
- Incorrect WAN settings
Solution:
Restore original settings and try again.
Best Practices and Pro Tips
Use Trusted DNS Providers
Recommended options include:
- Cloudflare DNS
- Google DNS
- OpenDNS
Keep Router Firmware Updated
Firmware updates improve security and compatibility.
Reboot After Major Changes
Restarting ensures new settings are properly applied.
Monitor Network Performance
Compare speed and reliability before and after changing DNS.
Document Configuration Changes
Maintain records for troubleshooting and future maintenance.
Related Guides
If you’re troubleshooting devices connected to your network, these guides may also help:
- How to Restore a Backup on iPhone: https://multicaretechnical.com/how-to-restore-a-backup-on-iphone-icloud-mac-pc-itunes-guide
- How to Restore Deleted Instagram Messages: https://multicaretechnical.com/how-to-restore-deleted-instagram-messages-complete-recovery-guide
- How to Restore Closed Tabs in Safari on iPhone: https://multicaretechnical.com/how-to-restore-closed-tabs-safari-iphone-recover-recently-closed-tabs-easily
Frequently Asked Questions
1. Is changing DNS on a router safe?
Yes. Using reputable DNS providers such as Google DNS or Cloudflare DNS is generally safe and widely recommended.
2. Will changing DNS increase internet speed?
It may improve website lookup times and browsing responsiveness, but it does not increase your ISP’s actual bandwidth.
3. Do I need to restart my router after changing DNS?
In most cases, yes. Restarting ensures the new DNS settings take effect.
4. Which DNS server is best?
Cloudflare DNS (1.1.1.1) and Google DNS (8.8.8.8) are among the most popular choices.
5. Can I restore my original DNS settings?
Yes. Simply re-enter the previous DNS values or enable automatic DNS assignment.
Conclusion
Knowing how to change DNS on a router can improve browsing speed, enhance reliability, and provide better control over your network. Whether you use a TP-Link, Huawei, ZTE, AT&T, Quantum Fiber, or WE router, the process generally involves logging into the router dashboard, locating DNS settings, entering preferred DNS addresses, and saving the changes.
For home users and IT professionals alike, updating DNS at the router level is one of the simplest ways to optimize an entire network. By following the steps in this guide and using trusted DNS providers, you can create a faster and more reliable internet experience for every connected device.