Learn how to map a drive in Windows 10 with this step-by-step guide. Mapping a network drive can help you easily access shared network resources. Follow these simple instructions to connect to a network location and access its files and folders as if they were stored on your local computer.
Mapping a drive in Windows 10 is a simple process that allows you to connect to a network location and access its files and folders as if they were stored on your local computer. This can be a useful tool for individuals or businesses who need to access shared network resources regularly. In this article, we will walk you through the steps to map a drive in Windows 10.
Step 1: Identify the network location
Before you begin the mapping process, you will need to identify the network location you want to connect to. This could be a shared folder on a server, another computer on the network, or even a cloud storage service like OneDrive or Dropbox.
Step 2: Open File Explorer
To map a network drive, you will need to open File Explorer. You can do this by pressing the Windows key + E on your keyboard or by clicking on the File Explorer icon in the taskbar.
Step 3: Click on “This PC”
In the left-hand pane of File Explorer, you will see a list of locations, including “This PC.” Click on “This PC” to open it.
Step 4: Click on “Map network drive”
At the top of the File Explorer window, you will see a ribbon with several tabs. Click on the “Computer” tab, and then click on the “Map network drive” button.
Step 5: Choose a drive letter
In the “Map Network Drive” window that appears, you will need to choose a drive letter to assign to the network location. You can choose any available drive letter, but it is recommended to use a letter that is not already in use. You can also choose to reconnect to the network drive automatically each time you log on to your computer by checking the “Reconnect at sign-in” box.
Step 6: Enter the network location
In the “Map Network Drive” window, you will also need to enter the network location you want to connect to. This can be done in any one of two ways:
- If you know the path to the network location, you can enter it directly in the “Folder” field. For example, if the network location is \Server\Share, you would enter \Server\Share in the “Folder” field.
- If you don’t know the path to the network location, you can click on the “Browse” button to browse for it. This will open a window with a list of available network locations. Simply select the one you want to connect to and click “OK.”
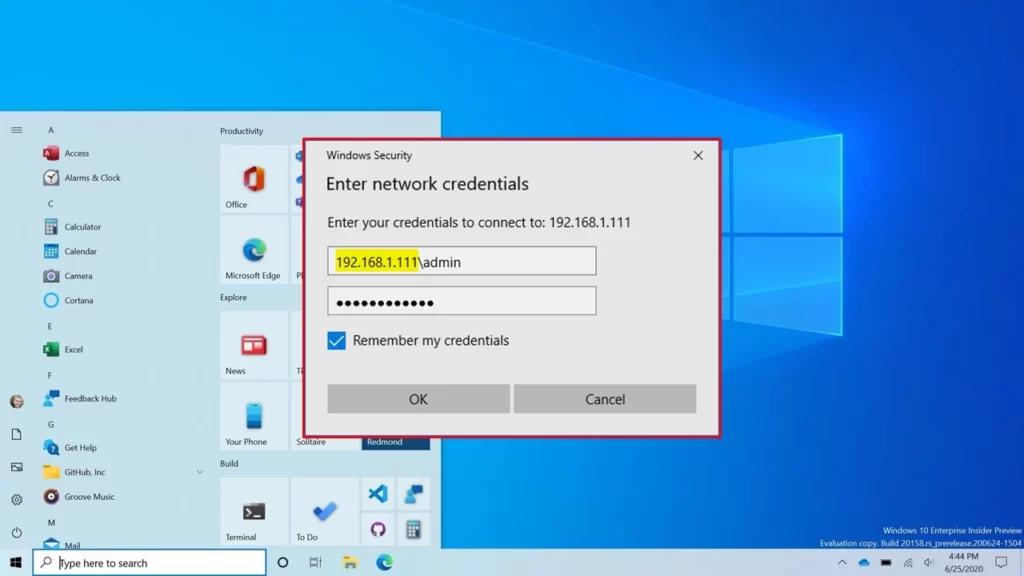
Step 7: Authenticate
If the network location requires authentication, you will be prompted to enter your username and password. Enter your user id and password and click “OK” to continue.
Step 8: Connect
Once you have entered the network location and authenticated (if necessary), click “Finish” to connect to the network location. You should now be able to access the files and folders on the network location through the drive letter you assigned in step 5.
In conclusion, mapping a drive in Windows 10 is a simple process that can save you time and effort by allowing you to easily access shared network resources. By following the steps outlined in this article, you should be able to map a drive in Windows 10 with ease.
You may also like
FAQ
Q: What is mapping a drive in Windows 10?
A: Mapping a drive in Windows 10 is the process of connecting to a network location and assigning a drive letter to it, allowing you to access its files and folders as if they were stored on your local computer.
Q: Why would I want to map a drive in Windows 10?
A: Mapping a drive in Windows 10 can be useful if you need to access shared network resources regularly, such as a shared folder on a server, another computer on the network, or a cloud storage service like OneDrive or Dropbox.
Q: Is mapping a drive in Windows 10 difficult?
A: Mapping a drive in Windows 10 is a relatively simple process that can be completed in a few easy steps.
Q: Can I map multiple drives in Windows 10?
A: Yes, you can map multiple drives in Windows 10. Simply repeat the steps outlined in this article for each network location you want to connect to.
Q: Can I map a drive in Windows 10 without knowing the path to the network location?
A: Yes, you can browse for the network location by clicking on the “Browse” button in the “Map Network Drive” window. This will show you a list of available network locations that you can choose from.