
Removing unwanted applications from Windows 11 is one of the easiest ways to free up storage space, reduce unnecessary background activity, and keep your PC organized. Whether you want to remove a program you no longer use, uninstall a third-party application, or delete a preinstalled Windows app, Windows 11 provides several ways to do it.
However, not every application can be removed in the same way. Some programs can be uninstalled through Settings, while others require Control Panel, PowerShell, or their own uninstall utilities.
In this guide, you’ll learn how to uninstall apps on Windows 11 using different methods, including how to remove stubborn applications, troubleshoot common uninstall errors, and completely remove unwanted software from your computer.
The instructions apply to Windows 11 Home and Pro editions, although some options may vary depending on your Windows version and device configuration.
Quick Answer: How to Uninstall Apps on Windows 11
The easiest way to uninstall an application in Windows 11 is through Settings:
- Press Windows + I to open Settings.
- Select Apps from the left sidebar.
- Click Installed apps.
- Find the application you want to remove.
- Click the three-dot menu next to the application.
- Select Uninstall.
- Follow the on-screen instructions to complete the removal.
Windows 11 will uninstall the selected application if it supports standard Windows uninstallation.
Table of Contents
- Why Uninstall Unwanted Apps in Windows 11?
- Method 1: Uninstall Apps Using Windows Settings
- Method 2: Uninstall Apps from the Start Menu
- Method 3: Uninstall Programs Using Control Panel
- Method 4: Uninstall Apps Using PowerShell
- Method 5: Uninstall Apps Using the App’s Uninstaller
- How to Uninstall Apps That Won’t Remove
- Common Uninstall Errors and Fixes
- Best Practices for Removing Windows 11 Apps
- Frequently Asked Questions
Why Uninstall Unwanted Apps in Windows 11?
Over time, your computer can accumulate applications that you no longer need. These may include trial software, outdated programs, manufacturer-installed utilities, games, and applications installed for temporary tasks.
Removing unnecessary applications offers several benefits:
- Free up storage space: Uninstalling large applications can recover valuable disk space.
- Reduce background activity: Some applications run background services even when you aren’t using them.
- Improve system organization: Removing unused software makes it easier to find applications you actually need.
- Reduce potential security risks: Uninstalling unsupported or outdated software reduces unnecessary attack surfaces.
- Avoid unwanted notifications: Some applications continue sending notifications or promotional messages.
Keep in mind that uninstalling applications does not automatically guarantee faster performance. The improvement depends on how much storage and system resources the removed applications were using.
Method 1: Uninstall Apps Using Windows Settings
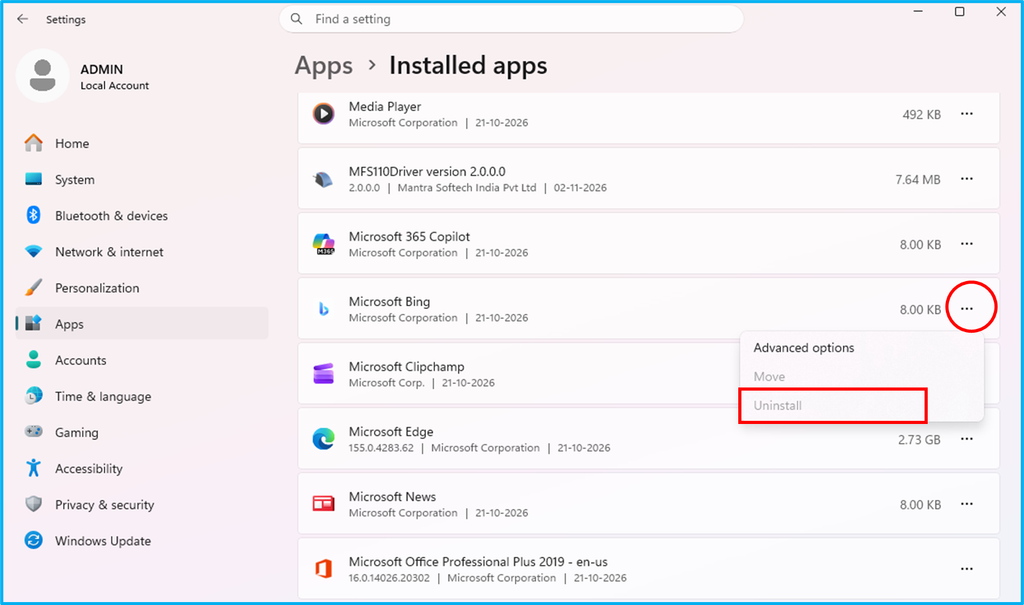
Using Windows Settings is the recommended method for removing most applications installed on Windows 11.
Follow these steps:
Step 1: Press Windows + I on your keyboard to open the Settings application.
Step 2: Select Apps from the left navigation panel.
Step 3: Click Installed apps to view the applications currently installed on your computer.
Step 4: Locate the application you want to remove. You can use the search box to find it quickly.
Step 5: Click the three-dot menu next to the application name.
Step 6: Select Uninstall from the available options.
Step 7: If Windows displays a confirmation message, select Uninstall again.
Step 8: Follow the application’s uninstallation wizard, if one appears.
Once the process finishes, the application should be removed from your installed applications list.
Pro Tip: If you have many installed applications, change the sorting option to Size (large to small) to identify applications that may be using significant storage space.
Method 2: Uninstall Apps from the Start Menu
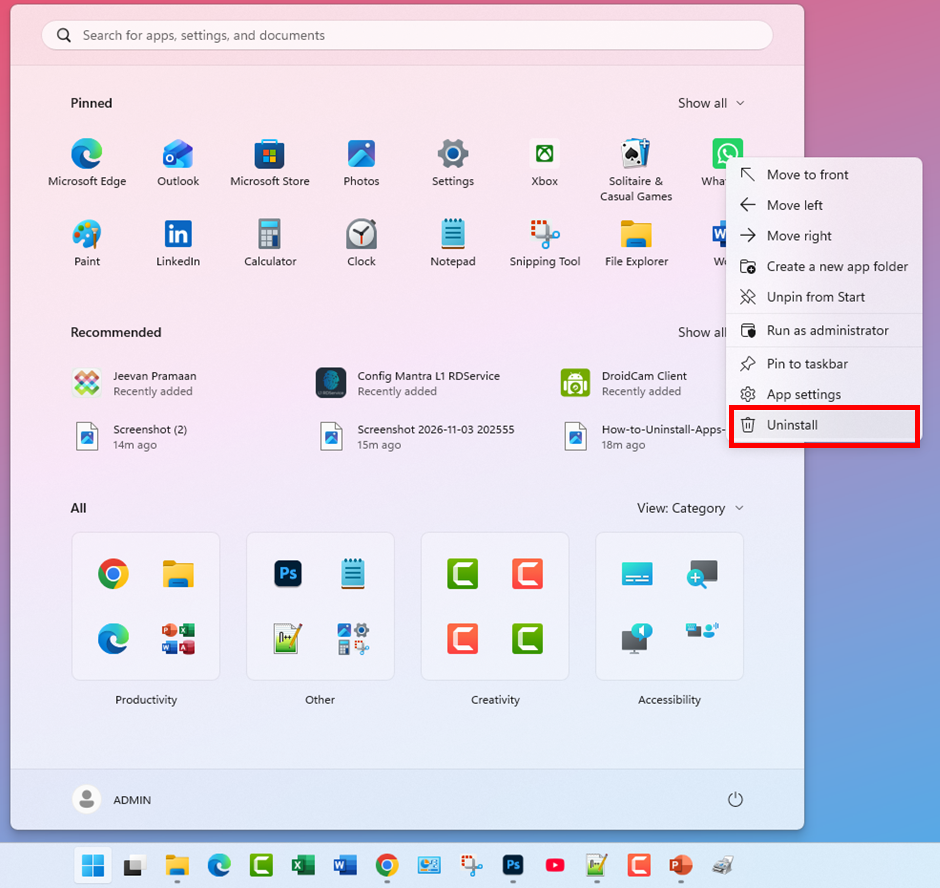
If you want to remove an application quickly, you can uninstall supported apps directly from the Start menu.
This method is particularly convenient when you already know the name of the application.
Follow these instructions:
- Click the Start button on the Windows 11 taskbar.
- Select All to display your installed applications.
- Find the application you want to uninstall.
- Right-click its icon or name.
- Select Uninstall from the context menu.
- Follow the instructions displayed on your screen.
Depending on the application, Windows may open the Installed apps page or launch the application’s uninstaller.
If the Uninstall option is unavailable, use the Settings method instead.
Method 3: Uninstall Programs Using Control Panel
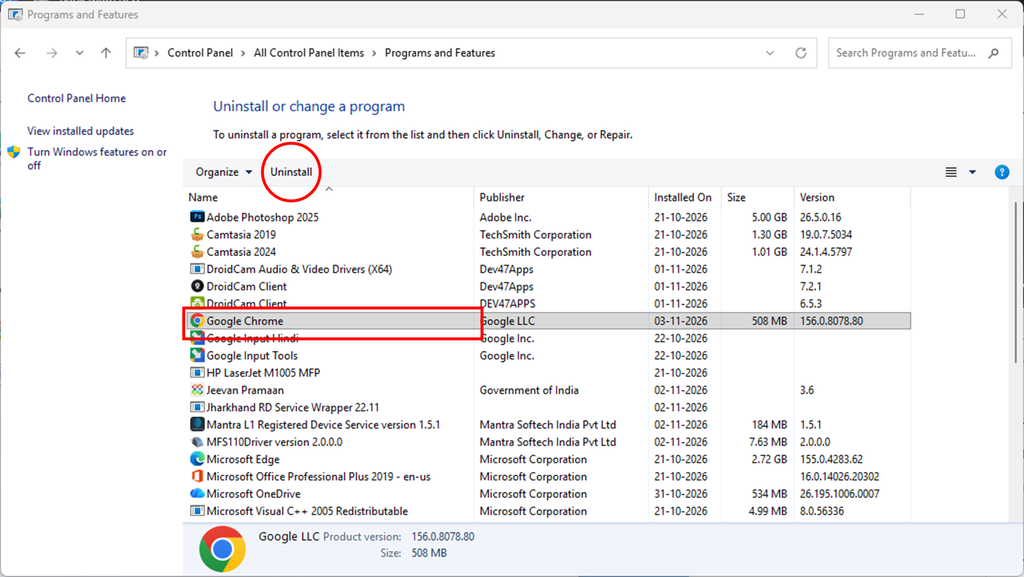
Control Panel is another useful option, especially for traditional desktop applications installed using older Windows installers.
Although Microsoft has moved many application management features to Settings, the classic Programs and Features interface remains available.
Here’s how to use it:
Step 1: Press Windows + R to open the Run dialog box.
Step 2: Type the following command:
appwiz.cplStep 3: Press Enter.
Step 4: The Programs and Features window will open.
Step 5: Find the program you want to remove from the list.
Step 6: Select the application and click Uninstall at the top.
Step 7: Follow the uninstall wizard to complete the process.
This method works particularly well for traditional desktop programs such as older utilities, software packages, and third-party applications.
However, Microsoft Store applications may not appear in this list.
Method 4: Uninstall Apps Using PowerShell
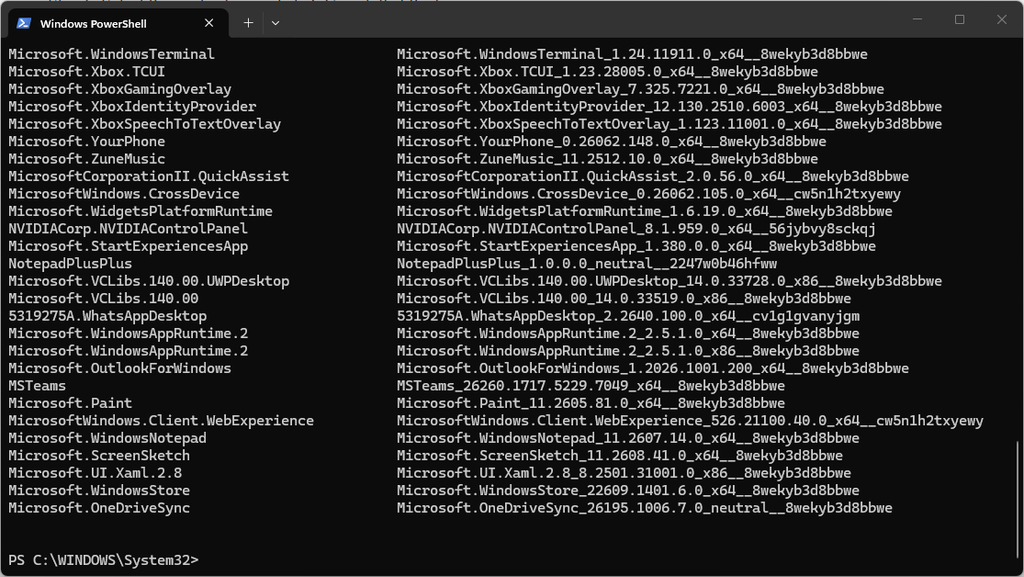
PowerShell provides additional control over application management. It is particularly useful for administrators and advanced users who need to remove certain provisioned or registered Microsoft Store apps.
Important: PowerShell commands can remove applications for the current user or affect Windows app provisioning. Always verify the package name before executing a removal command.
Step 1: Open PowerShell
- Right-click the Start button.
- Select Terminal (Admin) or Windows PowerShell (Admin), depending on your system.
- Approve the User Account Control prompt.
Step 2: Find the Installed Application
Run this command to display installed Appx packages for the current user:
Get-AppxPackage | Select-Object Name, PackageFullNameFind the application you want to remove and identify its package name.
Step 3: Uninstall the Application
Use the following command:
Get-AppxPackage *AppName* | Remove-AppxPackageReplace AppName with a distinctive part of the application’s package name.
For example, to remove the Xbox app for the current user, you can use:
Get-AppxPackage *XboxApp* | Remove-AppxPackageThe exact package name can vary by Windows version.
Step 4: Verify the Removal
Run the package search command again:
Get-AppxPackage *AppName*If the command returns no matching package, it is no longer registered for the current user.
Note: Removing an app for the current user does not necessarily remove its provisioning for future user accounts. Also, some Windows components are protected or required. Avoid removing system packages simply because their names are unfamiliar.
Method 5: Uninstall Apps Using the App’s Uninstaller
Some desktop applications include their own uninstallation utility. This is useful when an application does not uninstall correctly through Settings or Control Panel.
Follow these steps:
- Open File Explorer by pressing Windows + E.
- Navigate to the folder where the application is installed.
- Look for an executable file named
uninstall.exe,unins000.exe, or something similar. - Double-click the uninstaller.
- Follow the instructions displayed on the screen.
- Restart your computer if requested.
You can also check the application’s folder in the Start menu for an Uninstall shortcut.
This method is useful for certain third-party applications, older software, and programs with custom uninstall processes.
Important: Do not manually delete the application’s installation folder before running its uninstaller. Doing so can leave behind registry entries, services, and other components.
How to Uninstall Apps That Won’t Remove
Sometimes, Windows 11 refuses to uninstall an application. This can happen because the application is running, its uninstaller is damaged, or Windows does not have sufficient permissions.
Try the following solutions.
1. Close the Application Completely
An application may not uninstall while its processes are running.
- Press Ctrl + Shift + Esc to open Task Manager.
- Locate the application under Processes.
- Right-click it and select End task.
- Try uninstalling the application again.
Be careful not to terminate essential Windows processes.
2. Restart Your Computer
A pending installation or update may prevent an application from being removed.
Restart Windows 11 and try uninstalling the program again through Settings or Control Panel.
3. Run the Uninstaller as Administrator
Some applications require elevated permissions to remove files, services, or registry entries.
Find the application’s uninstall executable, right-click it, and select Run as administrator, if available.
4. Use Microsoft’s Program Install and Uninstall Troubleshooter
If an application has a damaged uninstall configuration, Microsoft’s Program Install and Uninstall troubleshooter may help resolve the issue.
It can help fix problems such as:
- Applications that cannot be uninstalled.
- Corrupted uninstall registry information.
- Programs that remain listed after removal.
- Problems that prevent new installations or updates.
Check Microsoft’s official support resources for the latest availability of this troubleshooting utility.
5. Check Whether the Application Is Managed by Your Organization
On a work or school computer, certain applications may be installed or controlled through organizational policies.
If the Uninstall option is unavailable or Windows displays a message that your administrator manages the application, contact your IT administrator.
Do not attempt to bypass organizational restrictions.
Common Uninstall Errors and Fixes
Here are some common problems you may encounter when uninstalling applications in Windows 11.
| Error or Problem | Possible Solution |
|---|---|
| Uninstall option is missing | Try Control Panel or the app’s uninstaller. |
| Application is currently running | Close it using Task Manager. |
| Access is denied | Use an administrator account. |
| Uninstaller cannot be found | Repair or reinstall the application, then uninstall it. |
| Application remains in the list | Restart Windows and check the Installed apps page again. |
| App cannot be removed | Try Microsoft’s Program Install and Uninstall troubleshooter. |
| Windows displays an error during removal | Check the error details and application-specific support documentation. |
What If You Cannot Uninstall Microsoft Phone Link?
Microsoft Phone Link is a built-in Windows application that connects your Android phone or iPhone to your PC.
Depending on your Windows installation, its removal options may differ.
If you want to remove it completely, follow our detailed guide:
How to Uninstall Phone Link in Windows 11
Can You Uninstall Microsoft Edge?
Microsoft Edge is integrated with Windows 11, and its uninstall availability depends on your Windows version, region, and applicable system configuration.
If you’re trying to remove Edge, read our dedicated tutorial:
How to Uninstall Microsoft Edge on Windows 11: Step-by-Step Guide
How to Remove Clawdbot or Cloudbot Completely?
If you have installed Clawdbot or Cloudbot and want to remove all associated components, including application files and related processes, follow our detailed removal instructions:
Clawdbot / Cloudbot Complete Removal Guide for PC and Mac
Best Practices for Uninstalling Apps in Windows 11
Before removing applications from your computer, consider these practical recommendations.
1. Check the application before uninstalling it.
Some applications provide important drivers, hardware controls, or system utilities. Make sure you understand their purpose before removing them.
2. Back up important application data.
Uninstalling software may remove locally stored settings, downloaded files, saved projects, or other application data.
Back up anything important before proceeding.
3. Avoid removing essential Windows components.
Do not remove unfamiliar system packages using PowerShell. Some applications are required for Windows features or hardware functionality.
4. Use trusted uninstall methods.
Prefer Windows Settings, Control Panel, or the application’s official uninstaller. Avoid downloading unknown third-party removal utilities.
5. Restart your computer when necessary.
Some applications leave files or services pending removal until Windows restarts.
6. Review startup applications.
If your goal is to improve startup performance, removing unused software is only one option. You can also review unnecessary startup programs through Task Manager.
7. Keep Windows updated.
Install available Windows updates to maintain system stability and compatibility with installed applications.
Conclusion
Uninstalling unwanted applications in Windows 11 is straightforward when you use the correct method.
For most users, the Settings > Apps > Installed apps option is the easiest and safest way to remove applications. You can also use the Start menu, Control Panel, PowerShell, or an application’s dedicated uninstaller when necessary.
If an application refuses to uninstall, check whether it is running, verify administrator permissions, and troubleshoot its uninstaller before attempting advanced removal methods.
By regularly reviewing your installed applications and removing software you no longer need, you can keep your Windows 11 computer organized, secure, and easier to manage.
Frequently Asked Questions (FAQs)
1. How do I uninstall an app completely in Windows 11?
Open Settings using Windows + I, select Apps > Installed apps, find the application, click the three-dot menu, and select Uninstall. For additional cleanup, use the application’s official removal utility if necessary.
2. Why can’t I uninstall an application in Windows 11?
An application may be running in the background, require administrator permissions, have a corrupted uninstaller, or be managed by your organization. Close the application, restart your PC, and try again.
3. How do I uninstall preinstalled apps in Windows 11?
Open Settings > Apps > Installed apps. Find the preinstalled application, click its three-dot menu, and select Uninstall if the option is available. Some built-in Windows applications cannot be removed normally.
4. Can I uninstall apps using Command Prompt in Windows 11?
Yes. Some applications can be managed through Windows command-line tools, including PowerShell and Windows Package Manager (winget). For example, you can use winget uninstall "App Name" if the application is listed in the winget package database. Always verify the application before removal.
5. Does uninstalling an application delete all its files?
Not always. Uninstalling an application generally removes its main program files, but some user data, settings, temporary files, and configuration files may remain. Check the application’s documentation if you need to remove additional data.